Developer test case
Test case for development for GEX, ATAC, and ARC workflow
In this section, we will run sc-preprocess using a test dataset from Cell Ranger (derived from fasta files are used by the internal testing tool for cellranger called cellranger testrun) to get new users ready to go as well as developers who need test cases for each of the workflow modes. Follow the steps to set up the test dataset, and run basic commands.
📌 Note: This section works the same for either GEX or ATAC and has a few modifications for ARC which we note below.
1. Launch the conda environment
If you haven’t installed sc-preprocess already, see the Installation page. Installation is a single command: conda env create -f environment.yaml.
Activate the sc-preprocess conda environment with the following command:
conda activate snakemake8
3. Generate input files for test
The command sc-preprocess generate-test-data conveniently creates a directory containing all the input files necessary you need to run the test dataset.
# Read about test data set
sc-preprocess generate-test-data -h

sc-preprocess generate-test-data GEX --output-dir tests/00_TEST_DATA_GEX
sc-preprocess generate-test-data ATAC --output-dir tests/00_TEST_DATA_ATAC
sc-preprocess generate-test-data ARC --output-dir tests/00_TEST_DATA_ARC
This should have produced the following file structure:
$ tree tests/00_TEST_DATA_GEX
tests/00_TEST_DATA_GEX
├── HPC_profiles
│   └── config.yaml
├── libraries_list_gex.tsv
├── reference_gex.txt
└── test_config_gex.yaml
4. Input files
Let’s walk through the input files necessary to run the workflow!
config.yaml
This YAML file contains all the bells and whistles needed to run the underlying snakemake workflow!
To generate a config file with all available parameters for your modality, pass --modality gex, --modality atac, or --modality arc:
sc-preprocess init-config --modality gex --output pipeline_config.yaml
This prints every parameter with its default value and inline comments. Required fields (like reference and libraries) are marked # REQUIRED. Optional pipeline steps (doublet_detection, demultiplexing) are included but set to enabled: false — uncomment and edit them when you need them.
For this test case, here is the GEX test config yaml file:
# tests/00_TEST_DATA_GEX/test_config_gex.yaml
project_name: test_gex
output_dir: tests/test_output_gex
resources:
  mem_gb: 64
  tmpdir: ''
directories_suffix: none
cellranger_gex:
  enabled: true
  reference: /path/to/cellranger-9.0.1/external/cellranger_tiny_ref
  libraries: tests/00_TEST_DATA_GEX/libraries_list_gex.tsv
  chemistry: auto
  normalize: none
  create-bam: true
  threads: 10
  mem_gb: 64
  runtime_minutes: 720  # max SLURM job runtime in minutes (default: 720 = 12 hours)
demultiplexing:
  enabled: false
  method: vireo                          # Options: vireo, demuxalot
  vireo:
    donors: 2
    cellsnp:
      vcf: /path/to/vcf/file.vcf.gz
      threads: 4
      min_maf: 0.0
      min_count: 1
      umi_tag: Auto
      cell_tag: CB
      gzip: true
doublet_detection:
  enabled: false
  method: scrublet
  scrublet:
    expected_doublet_rate: 0.06
    min_counts: 2
    min_cells: 3
To see all available parameters:
sc-preprocess show-params --step doublet_detection --method scrublet
The ATAC and ARC configs follow the same structure, replacing cellranger_gex with cellranger_atac or cellranger_arc. Generate them with:
sc-preprocess generate-test-data ATAC --output-dir tests/00_TEST_DATA_ATAC
sc-preprocess generate-test-data ARC --output-dir tests/00_TEST_DATA_ARC
libraries_list.tsv
This input file is a TSV file that contains the metadata and paths for your cellranger libraries. Here is the format:
batch |
capture |
sample |
fastqs |
|---|---|---|---|
A |
1 |
ABC-A-1 |
path/to/data/GEX/fastqs/ |
A |
2 |
IJK-A-2 |
path/to/data/GEX/fastqs/ |
B |
1 |
XYZ-A-1 |
path/to/data/GEX/fastqs/ |
Column descriptions:
batch: batch ID for grouping capturescapture: capture identifier or lane on the 10X chipsample: prefix of the filenames of FASTQs to selectfastqs: full path(s) to where the input FASTQ files are located - if providing multiple paths, separate them with commas.
Note: For the ARC workflow, the input file is a little bit different. You will need to create a tab-separated file that contains the metadata and paths for to cellranger ARC library csv files (files that contain paths the ATAC and GEX FASTQ files). This file, which we will call libraries_list_ARC.tsv during this test case, follows the following format:
batch |
capture |
CSV |
|---|---|---|
A |
1 |
path/to/data/ATAC/ARC_library.csv/ |
A |
2 |
path/to/data/ATAC/ARC_library.csv/ |
A |
3 |
path/to/data/ATAC/ARC_library.csv/ |
Column descriptions:
batch: batch ID for grouping capturescapture: capture identifier or lane on the 10X chipCSV: path to ARC library CSV (contains paths to fastas for both GEX and ATAC)
HPC_profiles/
The HPC_profiles/ directory contains another config.yaml that configures the cloud computing and HPC infrastructure settings to help snakemake launch parallel jobs. This config would be the argument for snakemake --profile HPC_profiles. You can read more about it here.
For this test dataset, we made the default HPC profile config to be compatible with SLURM. However, you can install another executor to match you local HPC/cloud computing infrastructure.
$ cat tests/00_TEST_DATA_GEX/HPC_profiles/config.yaml
executor: slurm
jobs: 10
default-resources:
- slurm_account={ACCOUNT}
- slurm_partition={PARTITION}
- runtime=720
retries: 2
latency-wait: 60
printshellcmds: true
keep-going: true
rerun-incomplete: true
5. Run a dry run
Before you run the workflow it’s a good idea to see how many jobs will be run to make sure your input files contain all the paths.
# Read about this command
sc-preprocess run -h

# Dry run
sc-preprocess run --config-file tests/00_TEST_DATA_GEX/test_config_gex.yaml --cores 1 --dry-run
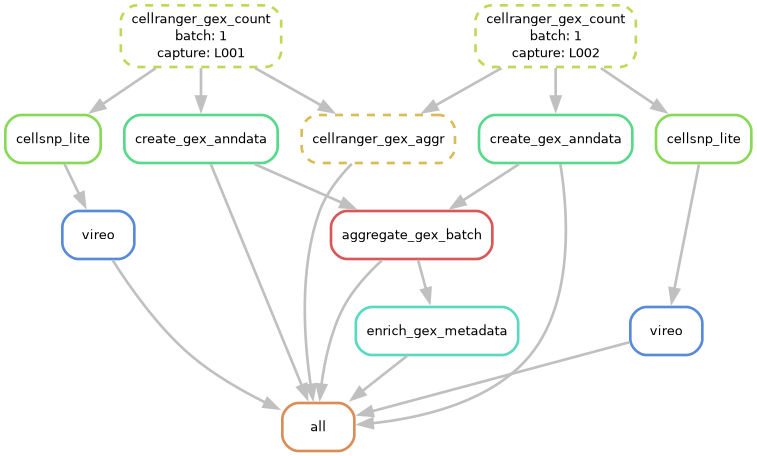
You can also visualize this with a dag file:
# Generate workflow DAG
sc-preprocess run --config-file tests/00_TEST_DATA_GEX/test_config_gex.yaml --cores 1 --dag | dot -Tpng > dag.png
6. Run the tool!
# Remove previous test runs
rm -rf 1_L00*
rm -r test_output_gex

# Local execution
sc-preprocess run --config-file tests/00_TEST_DATA_GEX/test_config_gex.yaml --cores 1
The flag --snakemake-args passes and arguments after it directly to snakemake. Please note that this flag has to be the very last flag in the command:
# Local execution - add more arguments to snakemake
sc-preprocess run --config-file tests/00_TEST_DATA_GEX/test_config_gex.yaml --cores 1 --snakemake-args --jobs 2
7. Pipeline output structure
After a successful run, the pipeline produces the following directory structure inside output_dir:
tests/test_output_gex/
├── 00_LOGS/                              # Log files and .done flags
│   ├── 1_L001_gex_count.done
│   ├── 1_L002_gex_count.done
│   ├── 1_gex_aggr.done
│   ├── 1_L001_gex_anndata.done
│   ├── 1_L002_gex_anndata.done
│   ├── 1_gex_batch_aggregation.done
│   └── 1_gex_enrichment.done
├── 01_CELLRANGERGEX_COUNT/               # Cell Ranger count outputs (per-capture)
│   ├── 1_L001/outs/
│   └── 1_L002/outs/
├── 02_CELLRANGERGEX_AGGR/                # Cell Ranger aggregation (per-batch)
│   └── 1/outs/
├── 03_ANNDATA/                           # Per-capture AnnData objects
│   ├── 1_L001.h5ad
│   └── 1_L002.h5ad
├── 04_BATCH_OBJECTS/                     # Batch-level aggregated objects
│   └── 1_gex.h5ad
├── 05_DEMULTIPLEXING/                    # Demux results (if enabled)
├── 06_DOUBLET_DETECTION/                 # Doublet results (if enabled)
└── 07_FINAL/                             # Enriched objects (analysis metadata merged in)
    └── 1_gex.h5ad
The pipeline processes data in phases:
Cell Ranger count (per-capture): Raw FASTQ processing
Cell Ranger aggregation (per-batch): Batch-level aggregation by Cell Ranger
Object creation (per-capture): Creates AnnData/MuData objects with traceability metadata (
batch_id,capture_id,cell_id)Batch aggregation: Merges per-capture objects into batch-level objects, preserving all metadata
Analysis (per-capture, if enabled): Demultiplexing and doublet detection run in parallel
Metadata enrichment: Merges analysis results back into batch objects, producing final objects in
07_FINAL/
Every cell in the final objects has three metadata columns for traceability:
batch_id: Batch identifier (e.g.,"1")capture_id: Capture/lane identifier (e.g.,"L001")cell_id: Globally unique identifier (e.g.,"1_L001_AAACCCAAGGAGAGTA-1")
8. Launching on HPC
To launch on the HPC, we will use the --snakemake-args command to pass additional arguments to snakemake to let it know we are going to use an HPC. The --snakemake-args must be the LAST argument and anything after it will be snakemake arguments passed directly to snakemake.
Note: If the directory gets locked, you can unlock it by running:
sc-preprocess run --config-file <your_config.yaml> --cores 1 --snakemake-args --unlock
The argument we will be passing straight to snakemake will be --profile. The provides snakemake with a path to a configurgation file that contains parameters fro runnign the is workflow on an HPC or cloud computing environment. Run snakemake -h to read more detail.
The command sc-preprocess generate-test-data you ran above already produced a boiler plate config yaml file filled out for SLURM here:
$ cat tests/00_TEST_DATA_GEX/HPC_profiles/config.yaml
executor: slurm
jobs: 10
default-resources:
- slurm_account=YOUR_ACCOUNT
- slurm_partition=YOUR_PARTITION
- runtime=720
retries: 2
latency-wait: 60
printshellcmds: true
keep-going: true
rerun-incomplete: true
You read about HPC executor functionality here. Fill out this config with HPC/cloud computing info that works for you! We made autogenerated an example for Slurm.
What is the difference between --cores and --jobs? The --cores command assigns the number of CPUs per jobs while the --jobs argument controls how many parallel jobs can be run at the same time.
sc-preprocess run --config-file tests/00_TEST_DATA_GEX/test_config_gex.yaml --cores 1 --snakemake-args --unlock

# HPC execution - `--cores all` tell snakemake to use the `threads` assigned to each rule.
sc-preprocess run --config-file tests/00_TEST_DATA_GEX/test_config_gex.yaml \
                             --cores all \
                             --snakemake-args --profile tests/00_TEST_DATA_GEX/HPC_profiles
For common questions about re-running steps, .done file tracking, and cluster-mode lock files, see the FAQ.