Case study: 1K PBMC Gene Expression
In this case study, we will explain how to process 10X Gene Expression data by using the following test dataset: 1k PBMCs from a Healthy Donor (v2 Chemistry).
Learning objectives
Set up the configuration file
Compose the input files
Run the workflow
Explore the resulting directory structure and where you can find processed data and metadata.
Import the pre-processed data into Scanpy to get started with single-cell gene expression analysis.
Download input data
Here we will download the 1k PBMCs from a Healthy Donor (v2 Chemistry) and the human reference genome for Cell Ranger:
Download GEX data
mkdir tests/PBMC_1K_GEX && cd tests/PBMC_1K_GEX

# Input fastq files
wget https://cf.10xgenomics.com/samples/cell-exp/3.0.0/pbmc_1k_v2/pbmc_1k_v2_fastqs.tar

# Human reference genome
wget "https://cf.10xgenomics.com/supp/cell-exp/refdata-gex-GRCh38-2024-A.tar.gz"
Extract files
tar -xvf pbmc_1k_v2_fastqs.tar
tar -xvf refdata-gex-GRCh38-2024-A.tar.gz
Set up the input files
Initialize a config file:
pipeline_config.yaml
Run the following command to generate a config file with all available GEX parameters:
sc-preprocess init-config --modality gex --output pipeline_config.yaml
This writes every parameter with its default value and inline comments. Fields marked # REQUIRED must be filled in before running. Optional steps (doublet_detection, demultiplexing) are included but set to enabled: false — set them to true to activate them. For demultiplexing, both method blocks (demuxalot and vireo) are always printed — only the one matching method: is used; the other is ignored.
Make a
libraries.tsv
This file tells the pipeline where to find your FASTQ files. It has four tab-separated columns: batch, capture, sample, and fastqs.
echo -e "batch\tcapture\tsample\tfastqs" > libraries.tsv
echo -e "1\tL001\tpbmc_1k_v2\t$(realpath pbmc_1k_v2_fastqs)" >> libraries.tsv
Column |
Description |
|---|---|
|
Batch identifier (e.g. |
|
Lane/capture identifier (e.g. |
|
Sample name passed to |
|
Absolute path to the directory containing FASTQ files |
📌 Note: The
fastqscolumn must be an absolute path —cellrangerwill fail with relative paths. The$(realpath ...)call above handles this automatically.
Then update pipeline_config.yaml to point to the necessary files e.g. libraries.tsv and reference genome path:
project_name: 1K_PBMC_GEX_PROCESSED
output_dir: 1K_PBMC_GEX_PROCESSED
resources:
  mem_gb: 32
  tmpdir: ''
directories_suffix: none
cellranger_gex:
  enabled: true
  reference: /path/to/refdata-gex-GRCh38-2024-A # <- add the correct path!
  libraries: libraries.tsv
  chemistry: auto
  normalize: none
  create-bam: true
  threads: 10
  mem_gb: 64
  # cellranger_gex_aggr
  aggr:
    threads: 16
    mem_gb: 64
    runtime_minutes: 240
  # create_gex_anndata
  anndata:
    threads: 16
    mem_gb: 32
    runtime_minutes: 120
  # aggregate_gex_batch
  batch_aggregation:
    threads: 16
    mem_gb: 32
    runtime_minutes: 120
  directories:
    LOGS_DIR: 00_LOGS
doublet_detection:
  enabled: true
  method: scrublet
  threads: 1
  mem_gb: 16
  scrublet:
    filter_cells_min_genes: 100
    filter_genes_min_cells: 3
    expected_doublet_rate: 0.06
    min_gene_variability_pctl: 85.0
    n_prin_comps: 30
    sim_doublet_ratio: 2.0
    random_state: 0
Run the tool
Dry-run
Before running the workflow it’s best practice to run a dry-run - a Snakemake command that will test the workflow without executing the underlying rules and print out its gameplan for every job in the workflow. The most informative part for us is the Job stats section which we highlight below. Job stats counts how many times individual Rules will be run and acts as a fantastic sanity check prior to executing the workflow. For example, if you have three GEX captures, then the Rule cellranger_gex_count should be run three times. In this case study, we only have one capture so all Rules are executed once.
# Read about this command
sc-preprocess run -h

# Dry run
$ sc-preprocess run --config-file pipeline_config.yaml --cores 1 --dry-run
[INFO] Config validated. Enabled steps: cellranger_gex, doublet_detection
[INFO] Running Snakemake with command: snakemake --snakefile /path/to/sc_preprocess/workflows/main.smk --configfile pipeline_config.yaml --cores 1 --use-conda --dry-run
[INFO] ============================================================
[INFO] Single-Cell Preprocessing Pipeline
[INFO] ============================================================
[INFO] Project: 1K_PBMC_GEX_PROCESSED
[INFO] Output directory: 1K_PBMC_GEX_PROCESSED
[INFO] Enabled steps: cellranger_gex, doublet_detection
[INFO] ============================================================
[INFO] libraries.tsv file format is valid.
[INFO] libraries.tsv file format is valid.
[INFO] Cell Ranger GEX: Found 1 sample(s) across 1 batch(es)
[INFO] Cell Ranger GEX: Found 1 sample(s) across 1 batch(es)
[INFO] Batch aggregation: Found 1 GEX batch(es)
[INFO] Batch aggregation: Found 1 GEX batch(es)
[INFO] Doublet Detection: Using scrublet method
[INFO] Doublet Detection: Using scrublet method
host: midway3-login1.rcc.local
Building DAG of jobs...
Job stats:
job                     count
--------------------  -------
cellranger_gex_count        1
cellranger_gex_aggr         1
create_gex_anndata          1
aggregate_gex_batch         1
run_scrublet                1
enrich_gex_metadata         1
all                         1
total                       7

...
Visualize the workflow with a DAG file
Our favorite way to visualize a dry-run of a workflow is to examine the DAG file. This image represents the network of jobs and dependencies found in the dry-run of the workflow. Each node is a job and each arrow represents a dependent rule.
📌 Note: If the rules are circles then the rule has not been run yet, however, if the rules are bordered with dotted lines then it’s been completed. This distinction is valuable when examining an incomplete workflow.
sc-preprocess run --config-file pipeline_config.yaml --cores 1 --dag | dot -Tpng > dag_gex_1k.png
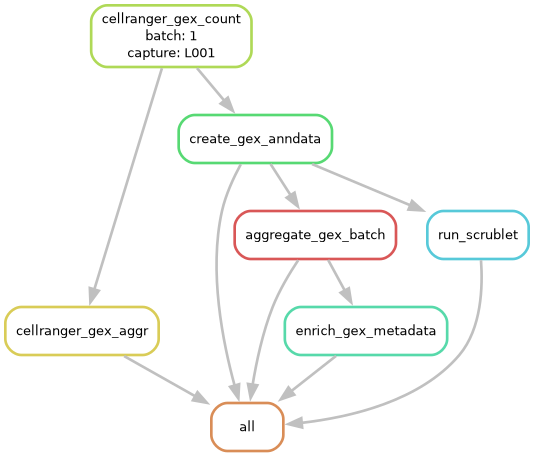
GEX Pipeline DAG — DAG file showing all rules and their dependencies.
Rule descriptions
Here we will break down the meaning of each rule so you can keep track of what’s going on.
cellranger_gex_count: Runs the command cellranger count per capture, aligning GEX reads to the reference genome and producing a gene-barcode matrix.
create_gex_anndata: Converts data from the Cell Ranger GEX output to a per-capture AnnData object (
.h5ad) usingsc.read_10x_h5(), adding traceability metadata (batch_id,capture_id,cell_id).cellranger_gex_aggr: Runs cellranger aggr which aggregates all per-capture Cell Ranger GEX outputs within a batch into a single normalized count matrix.
aggregate_gex_batch: Merges all per-capture AnnData objects into a single batch-level
.h5adfile, verifyingcell_iduniqueness across captures.run_scrublet: Runs Scrublet doublet detection on each per-capture AnnData object, adding doublet scores and predictions to cell metadata.
enrich_gex_metadata: Joins all downstream preprocessing metadata from demultiplexing and doublet detection into the batch-level AnnData object.
all: Final Snakemake rule that collects all expected outputs to ensure the full workflow is completed.
Local Execution
# Local execution
sc-preprocess run --config-file pipeline_config.yaml --cores 1
Snakemake arguments
We added the parameter --snakemake-args to send arguments straight to Snakemake!
For example, a popular Snakemake argument is --keep-going, where Snakemake will continue running jobs even if one fails. Please note that it MUST be the last argument in the command. Here is what it looks like in practice:
sc-preprocess run --config-file pipeline_config.yaml \
                             --cores 1 \
                             --dry-run \
                             --snakemake-args --keep-going
Another useful argument is --forcerun, which forces Snakemake to re-execute a specific rule and all rules that depend on it — without re-running expensive upstream steps like Cell Ranger. This is handy when you update a script and only want to reprocess from that point forward:
sc-preprocess run --config-file pipeline_config.yaml \
                             --cores 1 \
                             --snakemake-args "--forcerun create_gex_anndata aggregate_gex_batch"
📌 Note: You can pass multiple rule names to
--forcerun. Snakemake will automatically re-run all downstream rules that depend on the forced rules.
Run jobs in parallel!
Make a Snakemake SLURM configuration file
📌 Note: Replace the BASH variables
SLURM_ACCOUNTandSLURM_PARTITIONwith your SLURM appropriate setting before running the script below.
# Set your SLURM account and partition
SLURM_ACCOUNT=""   # <- replace with your account
SLURM_PARTITION=""    # <- replace with your partition

mkdir -p HPC_profiles
cat > HPC_profiles/config.yaml << EOF
executor: slurm
jobs: 10
default-resources:
- slurm_account=${SLURM_ACCOUNT}
- slurm_partition=${SLURM_PARTITION}
- runtime=720
retries: 2
latency-wait: 60
printshellcmds: true
keep-going: true
rerun-incomplete: true
EOF
# HPC execution - `--cores all` tells Snakemake to use the `threads` assigned to each rule.
sc-preprocess run --config-file pipeline_config.yaml \
                             --cores all \
                             --snakemake-args --profile HPC_profiles --keep-going
Cell Ranger cluster mode
By default, cellranger count runs all of its internal pipeline stages on the same node as the Snakemake job. On large datasets this can be slow because Cell Ranger is limited to the cores allocated to that single SLURM job.
Cluster mode lets Cell Ranger ARC submit each of its internal pipeline stages as independent SLURM jobs, parallelizing the work across your cluster. You can read about how to set it up here
To enable, add a cluster-mode: block with enabled: true to cellranger_gex in your config:
cellranger_gex:
  enabled: true
  reference: /path/to/refdata-gex-GRCh38-2024-A
  libraries: libraries.tsv
  chemistry: auto
  normalize: none
  create-bam: true
  threads: 1        # lightweight — just the cellranger count wrapper process
  mem_gb: 8         # memory for the wrapper job only
  cluster-mode:
    enabled: true   # submit Cell Ranger subjobs via the cluster scheduler
    jobmode: slurm  # Cell Ranger submits its own SLURM subjobs
    mempercore: 8   # GB of RAM per core on your cluster nodes
    maxjobs: 64     # max Cell Ranger subjobs running at once
  directories:
    LOGS_DIR: 00_LOGS
Field |
Description |
|---|---|
|
|
|
|
|
GB of RAM per CPU core on your cluster nodes — tells Cell Ranger how to size its subjobs |
|
Maximum number of Cell Ranger subjobs submitted at once |
|
Milliseconds between job submissions (optional, default is fine) |
You can confirm cluster mode is active by checking the log file — each pipeline stage will show (run:slurm) instead of (run:local):
2026-04-13 13:20:25 [runtime] (run:slurm)   ID.1_L001.SC_RNA_COUNTER_CS.WRITE_GENE_INDEX.fork0.chnk0.main
2026-04-13 13:20:37 [runtime] (run:slurm)   ID.1_L001.SC_RNA_COUNTER_CS.DETECT_COUNT_CHEMISTRY.fork0.chnk0.main
Resuming a killed run: If the job is killed mid-run, Cell Ranger’s Martian runtime saves checkpoints after each completed stage. The pipeline automatically removes the _lock file left by the killed process, so resubmitting the Snakemake job will resume from the last completed stage rather than starting over.
Interpreting STDOUT
After starting the program you should see an output that looks like this, let’s break it down:
$ sc-preprocess run --config-file pipeline_config.yaml \
                               --cores all \
                               --snakemake-args --profile HPC_profiles
[INFO] Config validated. Enabled steps: cellranger_gex, doublet_detection
[INFO] Running Snakemake with command: snakemake --snakefile /path/to/sc_preprocess/workflows/main.smk --configfile pipeline_config.yaml --cores all --use-conda --profile HPC_profiles
Using profile HPC_profiles for setting default command line arguments.
[INFO] ============================================================
[INFO] Single-Cell Preprocessing Pipeline
[INFO] ============================================================
[INFO] Project: 1K_PBMC_GEX_PROCESSED
[INFO] Output directory: 1K_PBMC_GEX_PROCESSED
[INFO] Enabled steps: cellranger_gex, doublet_detection
[INFO] ============================================================
[INFO] libraries.tsv file format is valid.
[INFO] libraries.tsv file format is valid.
[INFO] Cell Ranger GEX: Found 1 sample(s) across 1 batch(es)
[INFO] Cell Ranger GEX: Found 1 sample(s) across 1 batch(es)
[INFO] Batch aggregation: Found 1 GEX batch(es)
[INFO] Batch aggregation: Found 1 GEX batch(es)
[INFO] Doublet Detection: Using scrublet method
[INFO] Doublet Detection: Using scrublet method
host: midway3-login1.rcc.local
Building DAG of jobs...
SLURM run ID: d1ae475f-13fd-4b08-a17d-256664e8ad48
MinJobAge 120s (>= 120s). 'squeue' should work reliably for status queries.
Using shell: /usr/bin/bash
Provided remote nodes: 10
Job stats:
job                     count
--------------------  -------
cellranger_gex_count        1
cellranger_gex_aggr         1
create_gex_anndata          1
aggregate_gex_batch         1
run_scrublet                1
enrich_gex_metadata         1
all                         1
total                       7

Select jobs to execute...
Execute 1 jobs...

[Sun Apr 12 16:04:49 2026]
rule cellranger_gex_count:
    input: /path/to/refdata-gex-GRCh38-2024-A, /path/to/PBMC_1K_GEX/pbmc_1k_v2_fastqs
    output: 1K_PBMC_GEX_PROCESSED/01_CELLRANGERGEX_COUNT/1_L001/outs/filtered_feature_bc_matrix.h5, 1K_PBMC_GEX_PROCESSED/01_CELLRANGERGEX_COUNT/1_L001/outs/web_summary.html, 1K_PBMC_GEX_PROCESSED/01_CELLRANGERGEX_COUNT/1_L001/outs/possorted_genome_bam.bam, 1K_PBMC_GEX_PROCESSED/01_CELLRANGERGEX_COUNT/1_L001/outs/filtered_feature_bc_matrix/barcodes.tsv.gz, 1K_PBMC_GEX_PROCESSED/00_LOGS/1_L001_gex_count.done
    log: 1K_PBMC_GEX_PROCESSED/00_LOGS/1_L001_gex_count.log
    jobid: 2
    reason: Missing output files: 1K_PBMC_GEX_PROCESSED/01_CELLRANGERGEX_COUNT/1_L001/outs/filtered_feature_bc_matrix.h5, 1K_PBMC_GEX_PROCESSED/00_LOGS/1_L001_gex_count.done
    wildcards: batch=1, capture=L001
    threads: 10
    resources: mem_mb=65536, mem_mib=62500, disk_mb=1000, disk_mib=954, tmpdir=<TBD>, slurm_account=pi-lbarreiro, slurm_partition=lbarreiro, runtime=720
Shell command: None
Job 2 has been submitted with SLURM jobid 46363794 (log: /path/to/PBMC_1K_GEX/.snakemake/slurm_logs/rule_cellranger_gex_count/1_L001/46363794.log).
Messages from this tool will always be prefaced in brackets e.g. [INFO], [WARNING], [ERROR].
The first [INFO] prints the preprocessing steps enabled in the config file. In this tutorial, we enabled Cell Ranger GEX to process the 1k PBMCs from a Healthy Donor (v2 Chemistry) and Doublet detection with Scrublet:
[INFO] Config validated. Enabled steps: cellranger_gex, doublet_detection
Next, we print the Snakemake command running under the hood for convenient debugging. The --snakefile path will reflect where sc-preprocess is installed in your environment — this is expected and you don’t need to use this path directly.
[INFO] Running Snakemake with command: snakemake --snakefile /path/to/sc_preprocess/workflows/main.smk --configfile pipeline_config.yaml --cores all --use-conda --profile HPC_profiles
After that, we print some more [INFO] about the run:
[INFO] ============================================================
[INFO] Single-Cell Preprocessing Pipeline
[INFO] ============================================================
[INFO] Project: 1K_PBMC_GEX_PROCESSED
[INFO] Output directory: 1K_PBMC_GEX_PROCESSED
[INFO] Enabled steps: cellranger_gex, doublet_detection
[INFO] ============================================================
Finally, we print [INFO] from every job so you can fact check your workflow i.e. are these the number of batches and samples you were expecting to preprocess?
[INFO] libraries.tsv file format is valid.
[INFO] Cell Ranger GEX: Found 1 sample(s) across 1 batch(es)
[INFO] Batch aggregation: Found 1 GEX batch(es)
[INFO] Doublet Detection: Using scrublet method
📌 Note: You may see some messages printed twice. This is expected — Snakemake evaluates the config in two passes during DAG construction.
Everything else are messages directly from Snakemake running the workflow you configured! If you are new to Snakemake please take some time to orient yourself: https://snakemake.readthedocs.io/en/stable/tutorial/tutorial.html
Log file paths for every Rule will be printed in the Snakemake stdout like this:
log: 1K_PBMC_GEX_PROCESSED/00_LOGS/1_L001_gex_count.log
For example, you could explore the log for that Cell Ranger GEX job by printing the log file like this:
$ cat 1K_PBMC_GEX_PROCESSED/00_LOGS/1_L001_gex_count.log
Martian Runtime - v4.0.5
Serving UI at http://midway3-0323.rcc.local:44865?auth=nTZ0qkEGdaSUvGtvxqySJq1uPiYiQHQQ5nIFFKYaxgM

Running preflight checks (please wait)...
Checking FASTQ folder...
Checking reference...
Checking reference_path (/path/to/refdata-gex-GRCh38-2024-A) on midway3-0323.rcc.local...
Checking optional arguments...

...

2026-04-12 10:30:40 [runtime] (chunks_complete) ID.1_L001.SC_RNA_COUNTER_CS.SC_RNA_COUNTER._MATRIX_COMPUTER.MAKE_SHARD
2026-04-12 10:30:40 [runtime] (run:local)       ID.1_L001.SC_RNA_COUNTER_CS.SC_RNA_COUNTER._MATRIX_COMPUTER.MAKE_SHARD.fork0.join
Examine the output directory structure
After successfully completing the workflow, you should see this resulting directory structure. Let’s break it down:
$ tree -L 2 1K_PBMC_GEX_PROCESSED/
1K_PBMC_GEX_PROCESSED/
├── 00_LOGS
│   ├── 1_L001_gex_count.done
│   ├── 1_L001_gex_count.log
│   ├── 1_L001_gex_anndata.done
│   ├── 1_L001_gex_anndata.log
│   ├── 1_gex_aggr.done
│   ├── 1_gex_aggr.log
│   ├── 1_gex_batch_aggregation.done
│   ├── 1_gex_batch_aggregation.log
│   ├── 1_gex_enrichment.done
│   ├── 1_gex_enrichment.log
│   ├── 1_L001_scrublet.done
│   └── 1_L001_scrublet.log
├── 01_CELLRANGERGEX_COUNT
│   └── 1_L001
├── 02_CELLRANGERGEX_AGGR
│   └── 1_aggregation.csv
├── 03_ANNDATA
│   └── 1_L001.h5ad
├── 04_BATCH_OBJECTS
│   └── 1_gex.h5ad
├── 06_DOUBLET_DETECTION
│   └── 1_L001_scrublet.tsv.gz
└── 07_FINAL
    ├── 1_gex.h5ad
    └── 1_gex_obs.tsv.gz
00_LOGS/
This directory contains all the .log and .done files created throughout the workflow and are organized by Batch_Capture_modality_rule. The .log files will contain any STDOUT printed from every step of the workflow. This allows you to dive in and interrogate any step of your single-cell preprocessing.
A quick way to find errors if you are debugging the workflow is to run:
grep -R "error" 1K_PBMC_GEX_PROCESSED/00_LOGS
The .done files are an internal checklist to keep track of a subset of rules that finished (don’t worry about it unless you are a developer and want to contribute to the code base).
01_CELLRANGERGEX_COUNT/
Here you will find all of the Cell Ranger count outputs for each individual capture.
02_CELLRANGERGEX_AGGR/
This will be the aggregated count matrices across batches. In this tutorial there is only one capture so you won’t find any processed data here.
03_ANNDATA/
Here you will find an AnnData object for every capture.
04_BATCH_OBJECTS/
Batch-level AnnData object created by merging all per-capture objects from 03_ANNDATA/. This is the aggregated, pre-metadata-enriched object — all cells from all captures in the batch are present, and cell_id uniqueness is verified. It does not yet contain doublet scores or demultiplexing results.
06_DOUBLET_DETECTION/
Doublet detection outputs from Scrublet.
07_FINAL/
The final enriched AnnData object with all preprocessing metadata joined in, ready for downstream analysis.
1_gex.h5ad
1_gex_obs.tsv.gz
Load the output for downstream analysis
Examine barcode metadata
Now that you have successfully preprocessed the dataset 1k PBMCs from a Healthy Donor (v2 Chemistry) we will show a few examples of how you can immediately start analyzing your data!
Check out per-barcode metadata with this file:
1_gex_obs.tsv.gz
$ python -c "import pandas as pd; df = pd.read_csv('1K_PBMC_GEX_PROCESSED/07_FINAL/1_gex_obs.tsv.gz', sep='\t'); print(df)"
                    cell_id  batch_id capture_id                barcode  n_genes_by_counts  total_counts  ...  pct_counts_mt  pct_counts_ribo  doublet_scrublet_scrublet_score  doublet_scrublet_scrublet_predicted_doublet
0    1_L001_AAACCCAAGGAGAGTA-1         1      L001  AAACCCAAGGAGAGTA-1               1234        4521.0  ...       3.210000         2.100000                         0.042301                                          0.0
1    1_L001_AAACGCTTCAGCCCAG-1         1      L001  AAACGCTTCAGCCCAG-1               2105        8934.0  ...       1.560000         4.200000                         0.038921                                          0.0
...
Scanpy
📌 Note: A companion Jupyter notebook for loading the output and generating QC visualizations is available at
notebooks/PBMC_1k_GEX_analysis.ipynb.
The final AnnData object in 07_FINAL/ contains all GEX data with all preprocessing metadata joined in. Load it with:
import scanpy as sc

adata = sc.read_h5ad("1K_PBMC_GEX_PROCESSED/07_FINAL/1_gex.h5ad")

# Inspect the data
print(adata)
print(f"\nTotal cells: {adata.n_obs}")
print(f"\nTotal genes: {adata.n_vars}")
print(f"\nObs columns: {list(adata.obs.columns)}")
AnnData object with n_obs × n_vars = 1222 × 33538
  obs: 'batch_id', 'capture_id', 'cell_id', 'barcode',
       'n_genes_by_counts', 'total_counts', 'pct_counts_mt', 'pct_counts_ribo', ...,
       'doublet_scrublet_scrublet_score', 'doublet_scrublet_scrublet_predicted_doublet'
  var: 'gene_ids', 'feature_types', 'mt', 'ribo', 'n_cells_by_counts', ...

Total cells: 1222
Total genes: 33538

Obs columns: ['batch_id', 'capture_id', 'cell_id', 'barcode', 'n_genes_by_counts',
              'total_counts', 'pct_counts_mt', 'pct_counts_ribo', ...,
              'doublet_scrublet_scrublet_score', 'doublet_scrublet_scrublet_predicted_doublet']
Immediately visualize QC metrics:
sc.pl.violin(adata, ['total_counts', 'n_genes_by_counts', 'pct_counts_mt'], jitter=0.4, multi_panel=True)
Seurat
The easiest way to load the final AnnData object in 07_FINAL/ into R to be analyzed with Seurat is by using the SeuratDisk package, as follows:
library(Seurat)
library(SeuratDisk)

# Convert .h5ad to .h5seurat format
Convert("1K_PBMC_GEX_PROCESSED/07_FINAL/1_gex.h5ad", dest = "h5seurat", overwrite = TRUE)

# Load the converted file into a Seurat object
seurat_obj <- LoadH5Seurat("1K_PBMC_GEX_PROCESSED/07_FINAL/1_gex.h5seurat")
A second option, which directly loads the AnnData file without creating an intermediate file, uses the zellkonverter and SingleCellExperiment packages. For example:
library(Seurat)
library(zellkonverter)
library(SingleCellExperiment)

# Read the .h5ad file as a SingleCellExperiment object
sce <- readH5AD("1K_PBMC_GEX_PROCESSED/07_FINAL/1_gex.h5ad")

# Convert to Seurat object
seurat_obj <- as.Seurat(sce, counts = "X", data = NULL)
For common questions about re-running steps, .done file tracking, and cluster-mode lock files, see the FAQ.